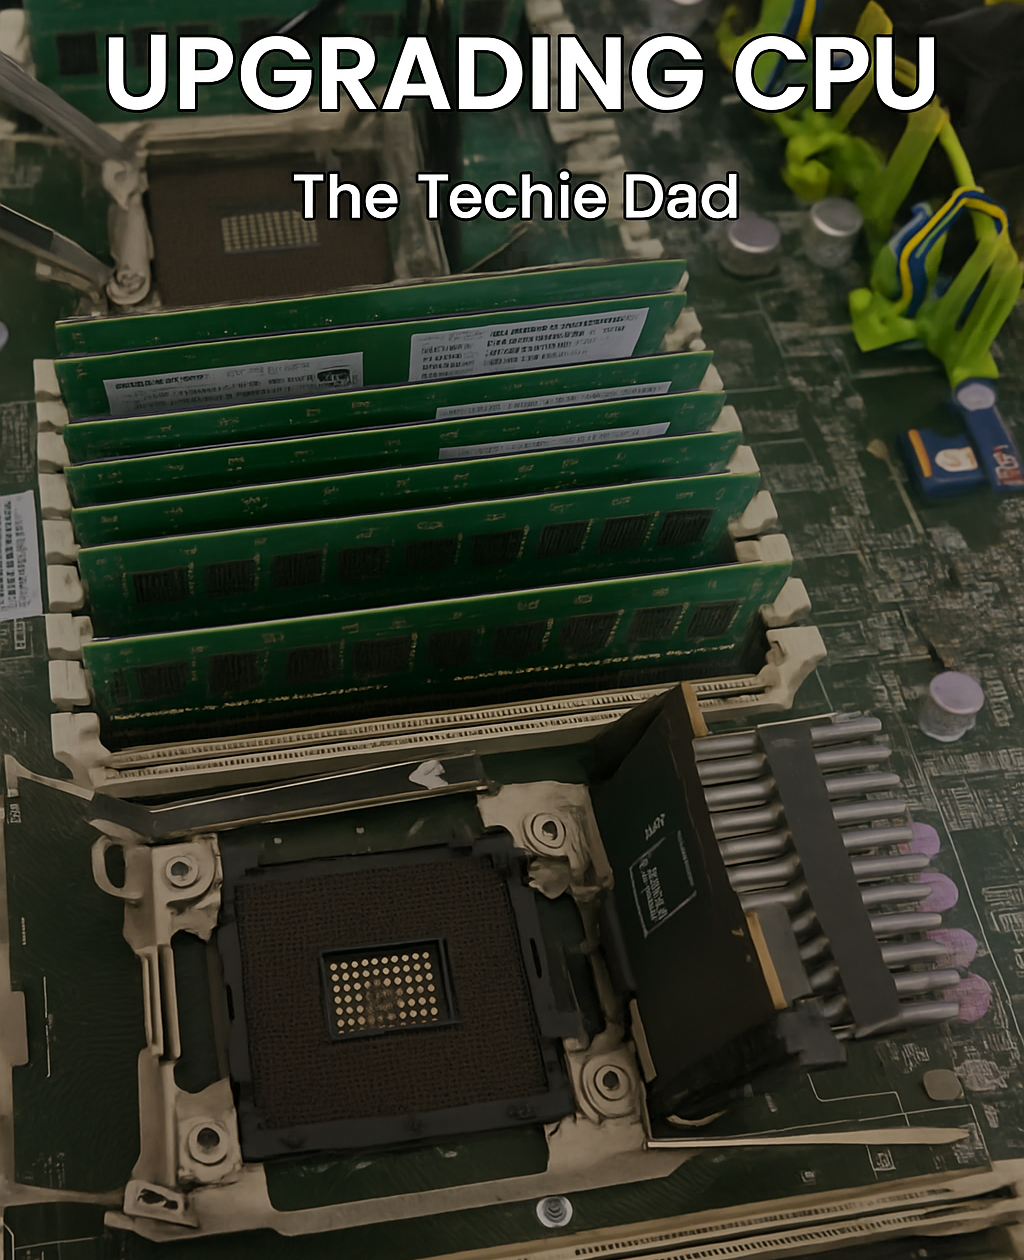
Upgrading the CPU in a Cisco UCS C-Series server can be a highly beneficial way to boost performance without the need to purchase a brand-new system. Whether you’re looking to increase processing power for virtualization, application performance, or just future-proofing your hardware, this guide will walk you through the process of performing a CPU upgrade on a standalone Cisco UCS C-Series server. Importantly, this guide does not include steps for UCS Manager since we are working with a standalone C-Series rack server.
We’ll cover everything from verifying compatibility to executing the upgrade using the Cisco Host Upgrade Utility (HUU). If you’re new to working with Cisco UCS hardware or just need a refresher, this step-by-step guide will ensure your upgrade goes smoothly.
Step 1: Verify CPU Compatibility
Before attempting any upgrade, it’s absolutely essential to verify which CPUs are compatible with your specific server model. Cisco UCS servers support a range of Intel Xeon processors, but the list of supported CPUs varies by chassis generation and BIOS version.
Cisco provides a comprehensive Hardware Compatibility List (HCL) for this purpose. You can find the most current compatibility guide for Cisco UCS CPUs at the following link:
> Cisco UCS Hardware and Software Compatibility Tool
To use the tool:
- Go to the page linked above.
- Select your server model (e.g., UCS C220 M5, C240 M6, etc.).
- Navigate to the “CPU” section.
- Review the list of supported processors and ensure your intended upgrade is on the list.
- Take note of any BIOS or firmware dependencies—some CPUs require a minimum BIOS version.
Important: Upgrading to a CPU that is not on the compatibility list may cause the server to fail POST (Power-On Self-Test) or may result in instability and unsupported behavior.
Step 2: Plan the Downtime
CPU upgrades require the server to be powered off and physically opened. This will cause downtime, so schedule the maintenance window accordingly. Also, make sure to:
- Back up any important data!
- Notify relevant stakeholders. ( This was my standalone server, I notified myself! LOL )
- Check whether your server is part of a cluster or has failover configurations.
Step 3: Gather the Necessary Tools and Components
To complete the upgrade, you’ll need the following:
- Compatible replacement CPU(s)
- Thermal paste (high-quality, non-conductive)
- Anti-static wrist strap ( If you don’t have one, make sure you touch another object before touching the server! )
- Philips screwdriver
- Cisco Host Upgrade Utility (HUU) ISO (I recommend using RUFUS to make a bootable USB)
- USB drive (at least 8 GB) to load HUU
- Monitor and keyboard connected directly to the server
Optional but recommended:
- Replacement heat sinks (if required or upgrading to higher wattage CPUs)
- Compressed air for dust removal
Step 4: Power Down and Prepare the Server
- Gracefully shut down the server from the operating system.
- Disconnect all power cables and peripherals.
- Wait for at least 30 seconds for residual electricity to discharge.
- Open the server chassis by releasing the top cover latch or screws (refer to your server model’s user manual).
Note: Always wear an anti-static wrist strap grounded to the chassis when working inside the server.
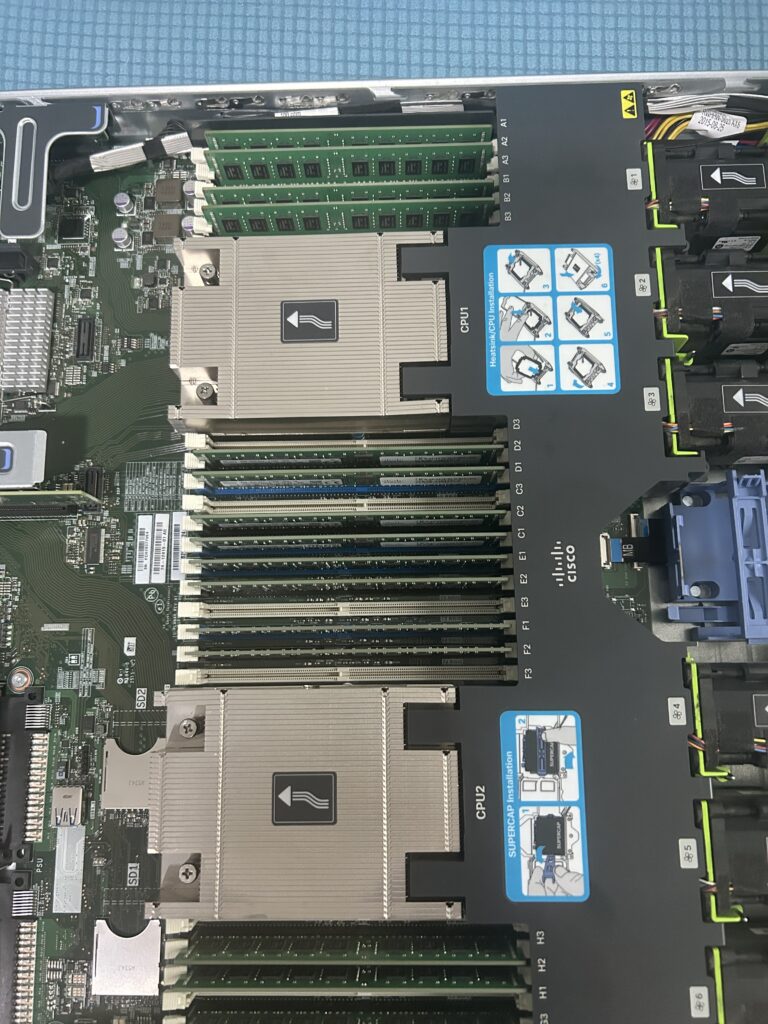
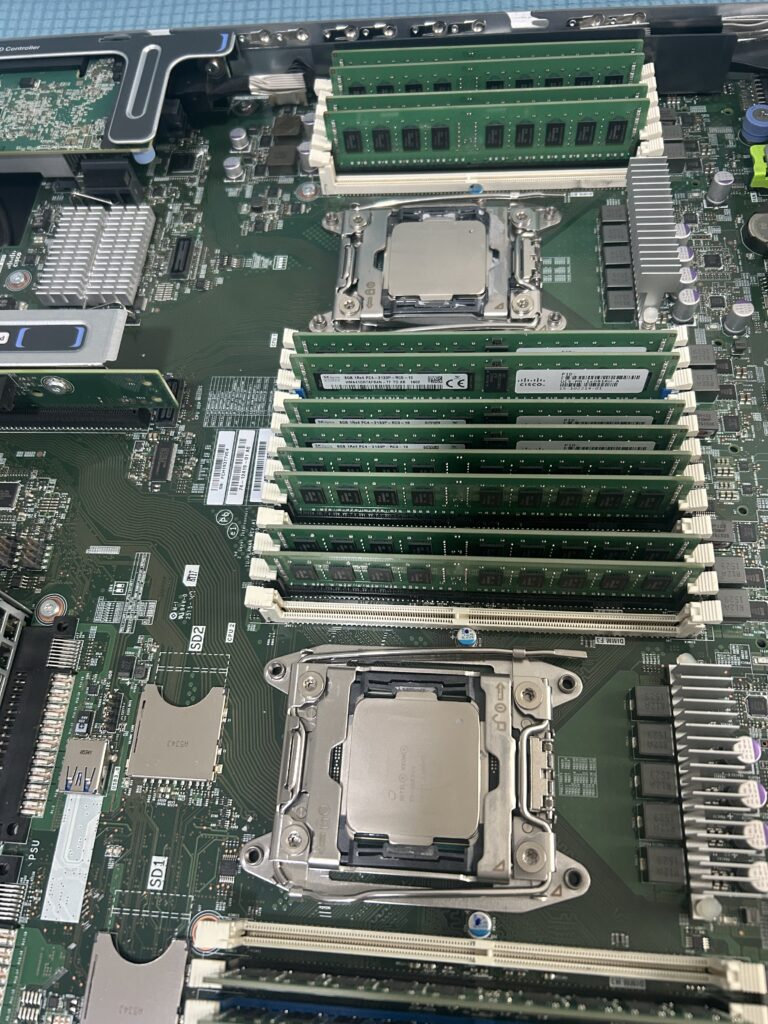
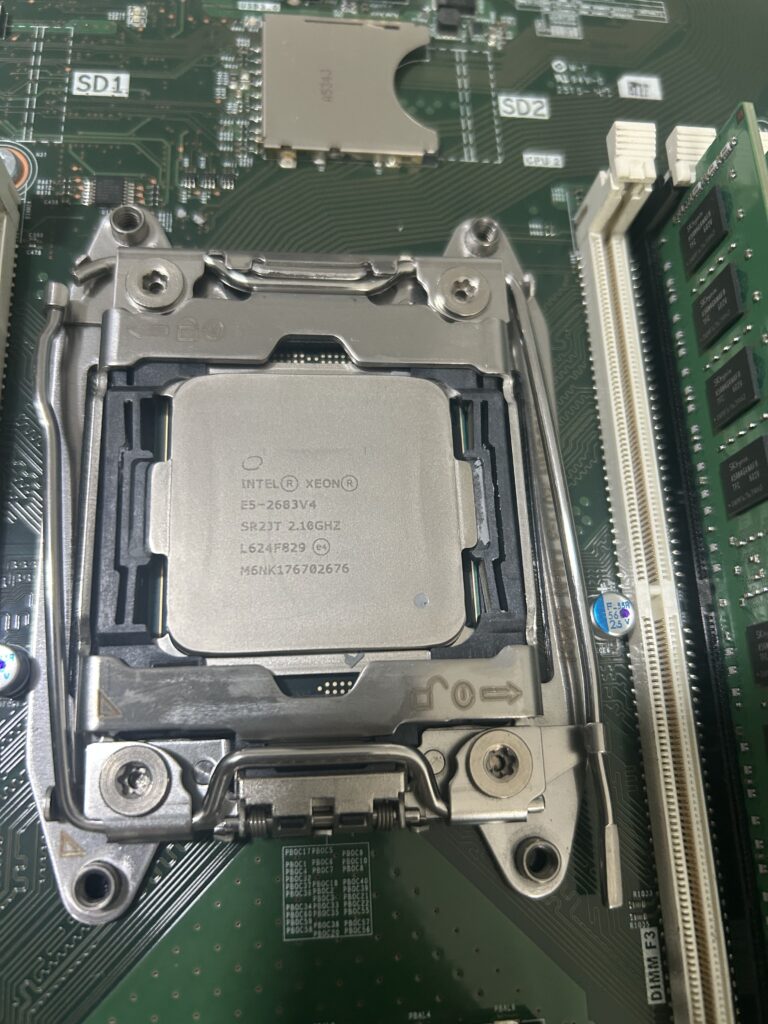
Step 5: Remove the Old CPU
- Identify the CPU socket(s) on the motherboard.
- If there are two CPUs, note that both may need to be replaced as a matched pair depending on the server model and configuration.
- Remove the heat sink carefully by loosening its screws in a diagonal pattern.
- Gently lift the old CPU out of the socket. Avoid touching the pins or gold contacts.
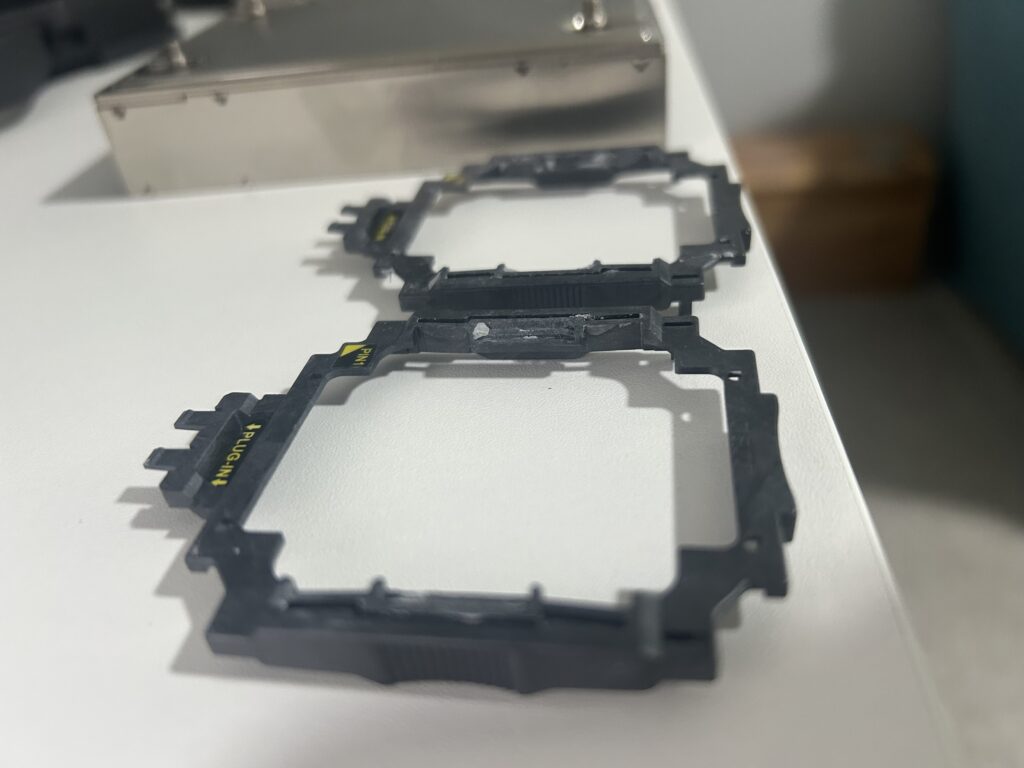
Step 6: Install the New CPU
- Removing and installing the CPUs fromt the plastic holders was a bit tricky, you’ll need to cleanup old thermal paste. On either side of the tabs holding the CPU, I used my thumbnail to pull the plastic tab off of the CPU while pushing downward. Be careful here, CPU may come flying out!
- Carefully align the new CPU with the socket. Look for alignment markers on the CPU and socket (usually a small triangle).
- Place the CPU into the socket without forcing it.
- Apply a pea-sized amount of thermal paste to the center of the CPU.
- Reattach the heat sink, tightening the screws gradually in a crisscross pattern to ensure even pressure.
If you’re using a new heat sink (recommended for high-performance CPUs), be sure it is also listed in the compatibility guide.
Step 7: Close the Chassis and Reconnect Cables
- Replace the top cover and secure any screws or latches.
- Reconnect all power cables, network cables, and peripherals.
- Connect a monitor and keyboard to the server for BIOS access. Or you can utilize the Cisco Integrated Management Controller (CIMC) KVM if you have this feature configured.
Step 8: Power On and Verify POST
- Power on the server.
- Monitor the boot screen to ensure that the server completes POST successfully.
- Enter the BIOS (usually by pressing
F2orDel) and verify that the new CPU(s) are correctly detected. - Check CPU temperature readings and fan speeds to ensure thermal stability.
Step 9: Update Firmware Using Cisco Host Upgrade Utility (HUU)
Even though the CPU is installed, it’s critical to ensure that the server firmware is updated to support the new hardware. This includes BIOS, CIMC, and other components.
What is HUU?
The Cisco Host Upgrade Utility (HUU) is a bootable image provided by Cisco that allows you to upgrade server firmware in an offline state.
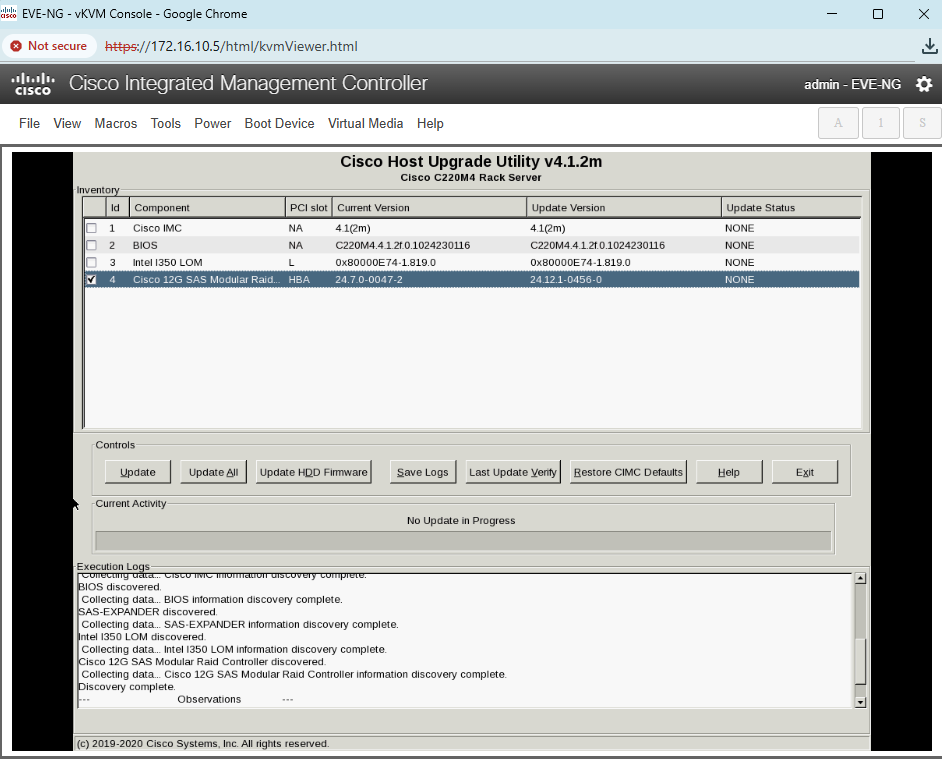
Steps to Use HUU:
- Download the HUU ISO for your server model from the Cisco Software Download Center.
- Use a tool like RUFUS to write the ISO to a bootable USB drive.
- Insert the USB drive into the server.
- Boot the server and press
F6to enter the Boot Menu. - Select the USB drive and boot into the HUU environment.
- Follow the on-screen prompts to upgrade:
- Select all relevant components (BIOS, CIMC, etc.)
- Ensure the new CPU is supported by the selected firmware version
- Complete the upgrade process and allow the server to reboot.
Important Tip: Do not power off or interrupt the server during the firmware update process.
Step 10: Final Validation
- Once the firmware upgrade completes and the server reboots:
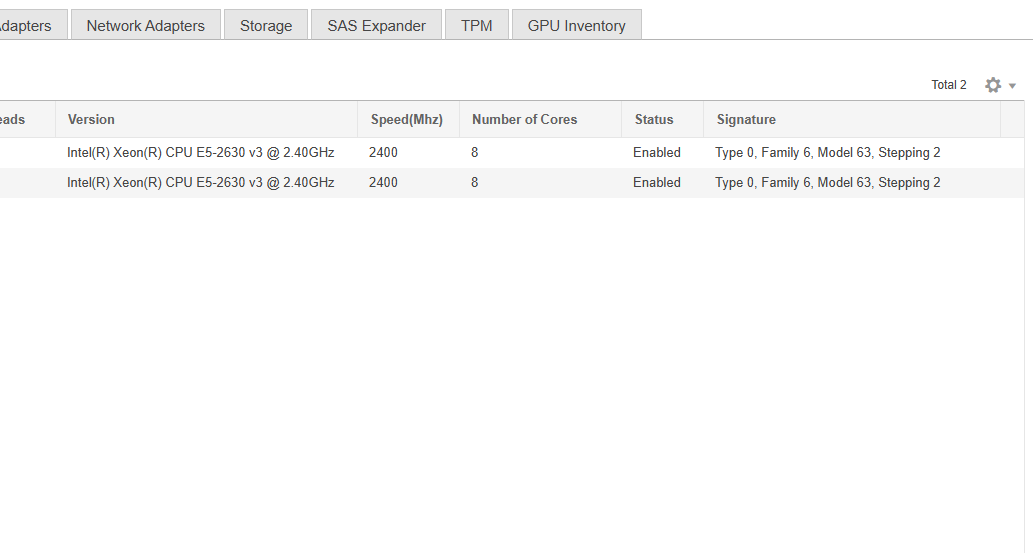
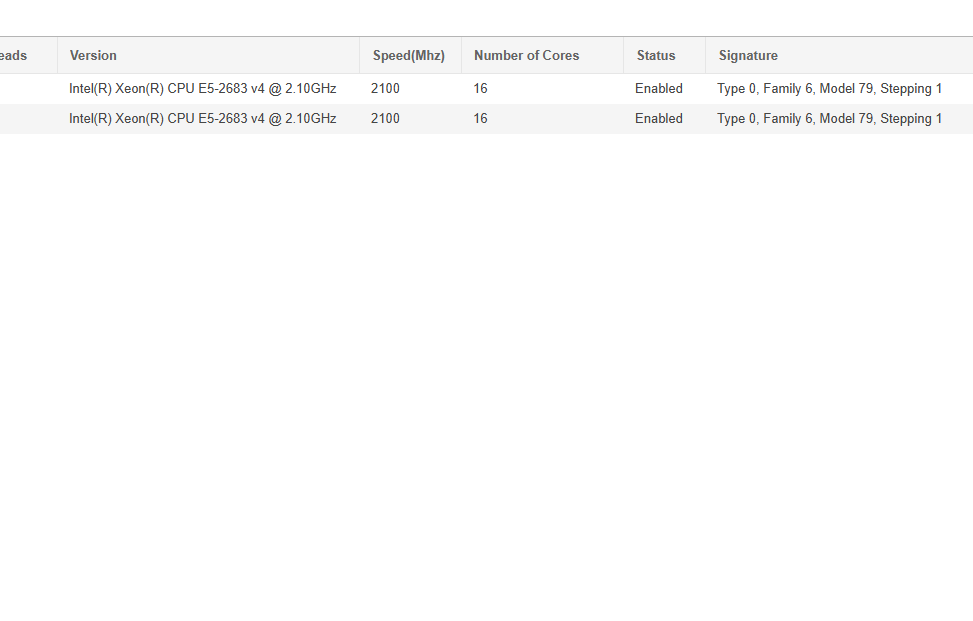
- Boot into the OS and check that it detects the new CPU.
- Verify CPU utilization and temperature in your monitoring software or via command-line tools.
- Run stress tests or benchmarks if needed to validate performance.
Conclusion
Upgrading the CPU in a Cisco UCS C-Series server can significantly extend the life and performance of your hardware investment. By carefully verifying compatibility, properly handling the hardware, and using tools like the Cisco Host Upgrade Utility (HUU), you can ensure a smooth and successful upgrade process.
Don’t forget to bookmark Cisco’s Hardware Compatibility List to stay current on supported components for your UCS server.
If you’ve successfully upgraded your UCS server’s CPU, share your experience or questions in the comments below!